How to Dropship on Shopify | Sell With No Inventory
Our independent research projects and impartial reviews are funded in part by affiliate commissions, at no extra cost to our readers. Learn more
Written and researched by:
![]() Comments: 0
Comments: 0
If you want to break into the ecommerce industry, but you don’t have a specific product to sell, or space to hold a vast inventory, dropshipping could be your answer. Thanks to its convenient business model and emphasis on third-party suppliers, it removes the stress of managing complicated supply lines and fulfilling orders.
Combine this with Shopify, an undisputed titan of ecommerce, and you’re onto a winner. Over 1 million stores currently use it as their base of online operations, and it’s officially the third biggest online retailer in the US after Amazon and eBay.
So, how can you get started? Below, we’ll show you how to dropship on Shopify, taking you through the process bit by bit. We’ll go through each step in more detail, and we’ll even include some expert tips in there too!
Before you know it, you’ll be a dropshipping maestro, and finding your way around the Shopify dashboard will be like second nature!
What is Dropshipping?
Starting a new business venture is always an exciting time, but before we put the cart before the horse, it’s important to make sure you’re really clear on all aspects of your chosen business model. So, what exactly is dropshipping?
Well, let’s start with what it’s not. With a traditional ecommerce store, you’d be expected to oversee all elements of the business. That means producing and storing the products, packaging them, and shipping them off. It’s a lot of work and it’s not always practical for everyone.
Dropshipping cuts out some of this hard graft. Instead, you source your products from a third-party supplier, and when an order comes in through your online store, that supplier is the one in charge of packaging and shipping your products to your customers.
Simply put, you don’t have to worry about anything outside of selecting the products you want to feature, and maintaining a good level of customer service!

Starting a new business venture is always an exciting time, but before we put the cart before the horse, it’s important to make sure you’re really clear on all aspects of your chosen business model. So, what exactly is dropshipping?
The best thing about dropshipping is that you won’t need to pay your dropshipping suppliers a single dime until an order comes through. Confused? Let us explain!
When you select your products, each one is assigned a wholesale price. This is what the supplier charges for that product (they need to make money somehow!). When you select your products from your supplier, they won’t charge you anything at that point.
You’ll then list the product on your store at the retail price. This will be higher than the wholesale price, and the difference between the two will be your profit.
Say that a customer visits your store and buys a novelty mug. The wholesale price for this is $5, but you sell it for $15. When your customer goes through the checkout process, the total amount will be split between you and the supplier. So $5 goes to the supplier, and the extra $10 goes to you. Sell 10 of those mugs, and you’ve made yourself $100!
If you’re unsure what to sell, or don’t have the space to store a ton of products, dropshipping is a great option. There’s room to make a nice tidy sum with this business model, especially because you don’t need to pay upfront for products or storage space. It’s no surprise that almost 33% of online stores have adopted the dropshipping model!
Further Reading
- Check out our guide on How to Start a Dropshipping Business if you want to understand how dropshipping works in more detail.
- If the thought of no inventory appeals, check out our guide on How to Start an Online Store Without Inventory for more helpful tips!
- Get inspired with our list of Dropshipping Business Ideas.
Dropshipping: Pros and Cons
| Pros | Cons |
|---|---|
| Good returns with minimal outlay You don’t need to invest a ton of cash to get started and the potential profits on offer will cover any initial spend. | No control over customer satisfaction You aren’t providing the products, so it’s harder to make sure your customers are happy, especially if the quality isn’t up to par. |
| No need for storage Suppliers will hold your stock for you, so you won’t need to source warehouse space to store your products. | Customer support is all on you Even though you’re not the one providing the products, you’re still responsible for offering customer support. As your business grows, investing in software to do this can also be pricey. |
| No packing and shipping No need to spend hours packaging and shipping your products – your third-party supplier takes care of that! | Harder to build a brand that stands out The popularity of dropshipping means that the market is pretty saturated, so building a brand that stands out from the competition is tough and takes a lot of dedication! |
| Work from anywhere All you need is a laptop and an internet connection! | Limited control over shipping Letting someone else handle shipping has its advantages, but if something goes wrong or an order is delayed, you’re the one who has to deal with the unhappy customer. |
| Less risk Is your t-shirt dropshipping business floundering? No problem! You can try selling something else, without sacrificing any initial investment costs. | |
| More time to focus on building your brand Not having to worry about inventory and shipping allows you to focus on perfecting your brand and forming strong relationships with your customers |
#1. Find Your Niche
- Why a niche is important
- Some things to think about when choosing your niche
Why Is a Niche Important?
As we’ve mentioned, dropshipping has had an enormous boom in popularity, and more people are using it as their main ecommerce method. Whilst this is good for the industry overall, it does mean that the market is saturated with stores all trying to sell the same things. If you really want to stand out from the crowd, you’ll need to find a niche that’s strong enough to get your customers’ undivided attention.
Luckily, dropshipping suppliers offer thousands of products to choose from, so you’ve got a wide catalog to peruse when searching for that elusive niche.
Suppliers offer so much choice that you might be tempted to take a mix-and-match approach, but we advise against that. If you narrow down your offering, you’ll have an easier time building a brand, and attracting regular customers.
How to Identify Your Niche

If you’re trying to pick your niche, here are a few questions we recommend asking yourself:
Make sure you choose a niche that is evergreen. This means that it’s not just a fad, and isn’t dependent on trends. These are products that will always be in demand. Here are a few evergreen categories to investigate if you’re still stuck:
- Clothing
- Beauty
- Sports and fitness
- Jewelry
- Home products
- Mother and kids
- Electronics
- Toys and entertainment
Further Reading
If you need a little extra help figuring out what to sell, check out our guide on how to find your niche online. It’s packed with hints and tips to help you narrow down your options.#2. Work Out Your Budget
- What to consider when setting your budget
Every business needs a solid financial plan, so working out how much of the green stuff you’ve got to burn before you get everything up and running is just good business sense.
Luckily, dropshipping is one of the cheapest ways to break into the ecommerce industry. Thanks to the fact that you won’t need to shell out a ton of cash on inventory or storage space, your initial costs will be pretty minimal.
That doesn’t mean you won’t have to pay anything, though – Shopify dropshipping still comes with a few costs that you should aim to factor in before you start selling.
Shopify subscription
Shopify doesn’t offer a free plan, so after your 3-day trial is up, you’ll need to pick one of its paid plans to continue. These start from $29 a month – however, you’ll have to spend more if you want more ecommerce functionality.
Dropshipping apps
Some dropshipping apps charge a monthly fee, too. For example, Spocket offers plans that start from $24 a month.
If you don’t want to pay extra on top of your Shopify account, we recommend using DSers. This is Shopify’s top-rated app, and you can get started for free with its fairly generous Basic plan. Alternatively, you can opt for Modalyst, which also has a free plan, although it does come with some restrictions.
Having an idea of the amount you’re willing to spend will make choosing between the various Shopify plans and dropshipping apps a little easier. Plus, it removes the risk for overspending, which can put a bit of a downer on those impressive dropshipping profit margins.
#3. Create a Shopify Account
- Shopify’s different pricing plans
- How to get started with Shopify
Shopify is an ecommerce platform that means business. During testing, it was the builder that our users were most likely to recommend, with a whopping 80% saying that they enjoyed the process. It’s a great fit for dropshipping because its ability to support larger stores matches one of dropshipping’s big perks – its scalability potential.
Signing up with Shopify only takes a few minutes. When you land on its homepage, enter your email address and click on the green button that says ‘Start Free Trial’.

You’ll be prompted to name your store, and then answer a series of short questions around whether you’re already selling, how much revenue you make, and what industry you operate in. Once you’ve entered your details, you’ll be directed to the Shopify dashboard. It’s as simple as that!
How Much Does Shopify Cost?
Once you’ve registered, you’ll have 14 days before you need to start paying for your Shopify account. This is plenty of time for you to explore the platform, and decide if it’s the one for you. When the trial period is up, however, you’ll need to pick a paid account to continue using Shopify for your dropshipping store.
Shopify offers three core plans:
- Shopify Basic – $29 per month
- Shopify – $79 per month
- Advanced Shopify – $299 per month

Further Reading
- Not sure if Shopify is quite what you’re after? Check out our full Shopify review to find out! We’ll dig into what the platform has to offer, and how it ranks against other ecommerce builders out there.
- If you want a more in-depth look at all three of Shopify’s plans, take a look at our Shopify pricing guide. Here, we dive into the nitty-gritty of what each package offers, so you can see which one is best for your business’s needs.
#4. Customize Your Online Store
- Picking a Shopify theme
- How to customize your online store
You’ll be pleased to know that creating and customizing your Shopify store is nice and easy. After you’ve answered the introductory questions, you’ll be taken to your dashboard, where you can start finetuning your website.

Choosing a Theme
Your first task is to pick a template. Shopify has 100+ themes to choose from, although some come with an extra cost. If you want to keep a tight grip on your budget, we recommend opting for one of Shopify’s nine free themes.
Good to know…
You can change your Shopify theme at any time, so don’t worry if you can’t afford a fancier template right now. As your business – and your income – grows, you can opt to shell out a bit more, and upgrade the aesthetic of your store.

Use the Shopify task checklist at the top of the dashboard to get started, and click on the ‘Customize theme’ button. This will redirect you to the customization page. If you scroll to the bottom, you can take a look at the different themes on offer.
Once you’ve found one you like, click the green ‘Add to theme library’ button. This will download the template, but it won’t automatically select it. If you want to change from the default, you’ll need to open the ‘Actions’ dropdown menu next to the new theme and select ‘Publish’.
Customizing Your Store
Shopify has a frontend and a backend editor. The former controls the outward appearance of your site. Here you can change your colors and fonts, add text, and change images.
The backend editor focuses on the more technical aspects of the store, allowing you to add your products, create collections, and manage discounts and deals. You’ll also need to use the backend editor if you want to add more pages to your site.
Customizing Your Shopify Theme
Further Reading
When it comes to designing your online store, this is just the tip of the iceberg. Check out our step-by-step guide on How to Use Shopify if you want a more thorough walkthrough.Not sure which theme to pick? Check out our Shopify Themes Review!
If you’re stuck on how to get your online store in tip-top selling condition, check out our guides below for a helping hand:
#5. Choose a Dropshipping App
- Which dropshipping apps are available
- How they work
With a traditional online store, adding products is something that you do whilst you’re customizing your website. With dropshipping, however, things work a little differently. To populate your store’s product pages, you’ll need to connect a dropshipping app.
There are plenty of options out there, but there are three we particularly recommend for Shopify dropshipping: DSers, Spocket, and Modalyst. To find out more about each, click on the plus symbol next to the headings below.
DSers
To begin, head to the Shopify backend editor and select ‘Apps’. This will take you to Shopify’s extensive app store. Click on ‘Customize your store’ in the top right-hand corner to go to the search function.

Shopify’s app store is one of its strongest features, and it gives you the chance to increase the functionality of your store.
Once you’ve searched for DSers and clicked on it, select the ‘Add app’ button to add it to your Shopify store. You’ll need to create a DSers account, but this doesn’t take long – just enter your email and create a password to finish the installation process, or let DSers use your Shopify account details to set it up on your behalf. Follow the simple registration steps — choose a plan and link your AliExpress account — and voila! You’re good to go.
After you’ve downloaded the app fully, it’s time to start adding products. And if you need a helping hand to get started, you can check out the help center on the DSers website or contact the DSers team via 24/7 live chat.
You’ll also get to enjoy access to exclusive suppliers under the AliExpress whitelist.
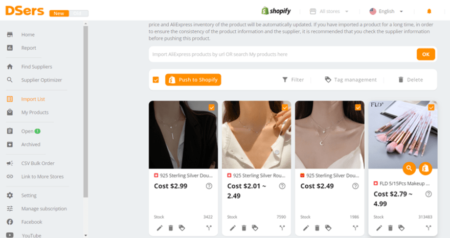
DSers saves you a bunch of time that you’d spend manually importing products by automating the process for you. All of the key product information is transferred over to your store, and you can edit any details directly in DSers. Alternatively, there’s a handy icon on any selected products which allows you to open the product page within your Shopify store for any adjustments.
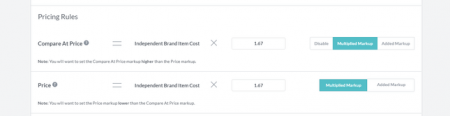
To set your pricing rules, head to your settings at the bottom of the left toolbar, and then navigate to the ‘Pricing Rule’ tab. Here, you can include any additional costs to the original product price. One thing to note is that DSers has three pricing rule variants: Basic, Standard, and Advanced. Simply pick the option you need!
For Basic, you can choose to add or multiply a fee with the original price. The Standard pricing rule is best if you intend to set a range of margins depending on the product’s original price. The Advanced rule gets a little more complicated, involving a complex formula to help your products remain profitable.
Using a pricing rule is a good idea because it keeps things consistent. If your suppliers’ prices fluctuate, the rules make sure that your retail price adjusts accordingly, so you don’t lose any money. However, you can manually override the pricing rules for individual products if you need to.
If you think you might need these features, you can upgrade to the Advanced plan, which starts at $15.90 per month (billed annually).

We recommend starting with the free plan first. As its name suggests, this gives you the chance to explore what DSers has to offer with minimal risk. However, as your business grows, it’s worth considering the Advanced or Pro plan for the extra features and functionality.
Spocket

Spocket also gives you the option to order samples – this is something we really recommend doing, so that you can confirm the quality of the product for yourself. After all, it’s going to be associated with your brand, so you want it to be good.
When you’re ready to add the product to your import list, hit the green ‘Add to Import List’ button. Once you’ve added a product to your list, you can edit its description and title, select the variants you want to stock, and choose your featured images.
Once you’re happy with your product selection, you can either add them all in one go by clicking ‘Push Current Page’, at the top of the list, or add them individually by selecting the ‘Push to Store’ button on specific product pages.
Spocket doesn’t have a default pricing rule, like you’d find on DSers or Modalyst, so you’ll need to use your own formula. Think carefully before you decide on this – if you change your rules at a later date, any products that have already been imported intoyour site will need to be re-added for the new rules to take effect.
For more substantial functionality, you’ll have to upgrade to the Empire plan. This allows you to sell up to 10,000 unique products, and 10,000 premium items, but it’ll cost you a whopping $99 per month.

It’s worth bearing in mind, however, that you can save money by choosing one of Spocket’s annual plans instead of paying a monthly fee. For example, the Pro plan is reduced to $24 per month when you choose to pay annually.
Despite this, it’s still a large amount of money to pay if you’re just starting out, and arguably better value can be found elsewhere. We recommend starting with DSers or Modalyst to begin with, and if your business flourishes, exploring Spocket when you have a bigger budget to play with.
Modalyst
In order to fully integrate Modalyst with your Shopify store, you’ll need to register an account first. To do this, follow the instructions from the app store, create a password, and then input your email address, business name, and customer base. Click the ‘Connect Store’ to finalize the process.


Each product page features a collection of images, alongside the wholesale cost, retail price, any predicted shipping costs, and your profit. Modalyst doesn’t feature reviews, but each product is given a star rating so be sure to check these out to avoid choosing poor quality items.
If you want to be really sure about what you’re selling, we recommend requesting a sample. Yes, this will mean you’ll have to wait for the sample to arrive before setting it live on your store, but we think this is a small price to pay for your reputation!
The process for adding products to your Import List is the same as with Spocket. Simply click the ‘Add to Import List’ button, either on the product page, or on its listing in the search results.
The Import List is where you’re going to make all of your last-minute tweaks before adding your items to your store. Set your product type, allocate them to a collection, insert tags, and polish up your description all in one place. You can use the tabs down the right-hand side of the product listing to flick between your General settings, Pricing, Variants, and more.

When you’ve made all of your changes, and you’re ready to add your products to your dropshipping store, hit the ‘Add to Shopify’ button on the right. This will add the product individually, but if you’ve got a whole list, you can tick the checkbox at the top and then ‘Add products to Shopify’ next to it.
You can leave these as they are or, alternatively, adjust them how you like by clicking in the values box to make changes. As with DSers and Spocket, you can override these rules for certain products, if necessary.
Costing $30 per month (billed annually), this package allows you to sell up to 250 products, which is a big step up from the Hobby plan’s pretty restrictive 25-product limit. Still, if your business is growing at an unstoppable rate (hooray!), 250 products might be too little. In this case, the $67 per month Pro plan, with its ability to sell an unlimited number of items, is a better fit.

#6. Set Up Payments
- Which payment processors Shopify offers
- Setting up payment processors on your Shopify store
Once you’ve selected your dropshipping app and your products, you’ll need to get your store ready to take your customers’ payments. With over 100 payment gateway options on offer, you won’t struggle to find a payment method to suit you. In addition to the big names out there such as PayPal and Google Pay, Shopify also has its own payment processor: Shopify Payments.
There are some big benefits to using Shopify’s own payment portal, the biggest one being that you won’t have to pay any transaction fees. If you opt to use other payment gateways, you won’t be able to avoid the extra charge.
The exact amount you’ll need to pay will depend on the Shopify plan you choose. Unsurprisingly, the more expensive your plan, the cheaper your transaction fee, with the basic plan charging 2%, the Shopify plan 1%, and the Advanced Shopify plan 0.5%

To set your payment options live, navigate to your Shopify dashboard, and then click ‘Settings’ at the bottom of the left menu. Select the ‘Payments’ icon. Here, Shopify will lead you through all of the steps to get your chosen payment gateways up and running. For each, you’ll be auto-directed to the provider’s own platform to complete the connection process.

Further Reading
If you’d like a more in-depth look at the pros and cons of using Shopify payments, check out our Shopify Payments Review.#7. Organize Shipping
- How to set up shipping on your Shopify store
One of the big attractions of dropshipping is that you don’t need to worry about the packaging and shipping of your products. Your supplier will take care of that, so all you need to focus on is making sure your store is full of great products, right?
Well, not quite. It might not be your responsibility to physically ship the products, but you do still need to set your shipping rules. Don’t worry though. You’re not completely on your own.
Each of the three dropshipping apps featured above provide some guidance. In the product listing, you’ll find information on the shipping requirements, including where your supplier will ship to, how much it costs, and how long it will take.

You can then use these guidelines to inform the shipping rules you set on Shopify. To set your shipping, click into the ‘Settings’ menu once again, and select the ‘Shipping and Delivery’ icon. Here, you can specify where you deliver to, as well as setting shipping prices.


79% of US consumers said that free shipping would make them more likely to shop online with a company, so offering this on your store is something to consider. Using the shipping information provided on your dropshipping app, you can adjust the retail prices of your products, so that they cover the shipping costs, too. This way, you won’t have to pay extra to dispatch your orders, but your customers won’t feel like they’re footing the bill either.
Read more: Shopify Shipping: A Beginner’s Guide
#8. Make it Legal
- The importance of checking your local requirements
- Selecting a business structure
- Applying for an EIN
- Registering your business
Dropshipping might be the easiest way into ecommerce, but you’re still starting a business. That means that alongside the excitement of opening your very own dropshipping store, you also need to do your paperwork, and make sure you meet the legal requirements too.
Not sure what they are? Below, we’ve compiled a checklist of all the things you need to tick off to make sure your business fits the legal criteria.
Sole Proprietorship – This is the cheapest and most basic type of business structure, which is why it’s also one of the most popular. Your business will be registered under your name, and you won’t have to deal with too much paperwork. However, it has no liability protection, so your personal assets could be at risk if anything goes wrong.
Limited Liability Company (LLC) – This structure offers more protection because your business is registered as separate from you. As a result, if you find yourself in debt or in a messy lawsuit, you aren’t personally liable. There are a few additional costs that go alongside an LLC structure, though.
C Corporation – This is the most expensive structure, but it’s also the one that offers the most liability protection. This type of structure is only really recommended for major companies.
Did we mention that you’ll need one of these if you want to work with a wider range of dropshipping suppliers in the future? Make sure you don’t miss this step!
How to Dropship on Shopify: Summary
If you’ve followed each step of our guide, you should be ready to start dropshipping with Shopify! All that remains to be done is to select your Shopify plan, and set your dropshipping store live. Before you start inviting customers in, let’s have a quick recap of the steps you should have completed:
- Find your niche
- Work out your budget
- Create a Shopify account
- Customize your online store
- Choose a dropshipping app
- Set up payments
- Organize shipping
- Make it legal
And that’s it – you’re ready to fulfill your dropshipping dreams and set your feet on the path to becoming an ecommerce tycoon! Make sure to come back and let us know how you got on, but for now, good luck!
FAQs
Written by:
Found this article helpful?
Share this article or comment below!
Leave a comment