How to Add Google Analytics to a Website | 8 Simple Steps
If you click to purchase a product or service based on our independent recommendations and impartial reviews, we may receive a commission. Learn more
When it comes to running your website, there are countless tools out there. From building websites that help you keep track of inventory to plug-ins that boost your site’s SEO (search engine optimization), there’s literally an entire industry built around helping you get more from your site.
But there are few tools out there that bring as much value as Google Analytics – particularly when you consider the fact that it is entirely free to use!
In this guide, we’re going to walk you through everything you need to know about adding Google Analytics to your own website.
Why Use Google Analytics?
If you’re reading this guide because you’re already convinced of the usefulness of Google Analytics, then feel free to jump to the next section. However, you may also learn something about the benefits of using this analytical tool for your website in the paragraphs that follow.
At its core, Google Analytics is a tool that’s used to track website performance and collect insights into your site’s visitors. It’s typically used by those who need a general overview, rather than deeper analysis, which is why it is very popular with both small and medium-sized businesses – particularly ecommerce websites.
The information gathered from Google Analytics can be used to analyze the behaviors of your customers: such as where they come from, and what they do once they’re on your website. This, in turn, can be used to help you optimize your website, to retain and convert your visitors. Insights from Google Analytics can also be used to help improve your marketing campaigns, and understand where best to spend your budget.
Because Google Analytics comes with a dashboard that automates the collection and display of data, it saves businesses a considerable amount of time when compared to manually gathering, imputing, and analyzing information. These reports are also fully customizable, so you can track only the aspects of your websites that matter most to you.
Another really handy aspect of Google Analytics – especially for ecommerce website owners – is the ability to track what’s being searched for on your site, which tells you exactly what people are looking to buy.
So, now you know why you need Google Analytics – but how do you get it set up? Read on to find out.
#1. Sign In or Create a Google Analytics Account
If you already use Google products such as Google Chrome, Google Maps, Google Translate, or even just Google Search, then there’s a strong likelihood that you already have a Google account.
If this is the case, then you can use this account to get set up on Google Analytics – simple!
However, if you don’t have an account – or if you’d like to use a separate account for managing business matters, such as your website – then you’ll need to set up a new account. You can set up a dedicated account for your business to run your Google Analytics, which can then later be used to easily set up other business tools, such as Google My Business.
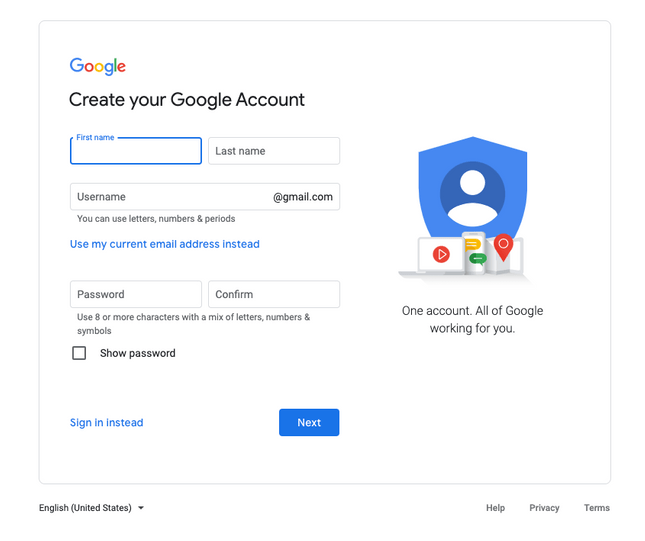
Either way, it’s simple to set up an account. The process is just slightly different depending on whether you want to use an existing email (such as your work email), or set up a new Gmail account.
Existing email:
- Go to the Google Accounts sign-in page
- Select ‘create an account’
- Enter your first and second name
- Select ‘use my current email address’
- Enter your current email address
- Click ‘Next’
- Open your verification email and verify using the code
- You’re done!
With a new Gmail account:
- Go to the Google Accounts sign-in page
- Select ‘create an account’
- Enter your first and second name
- Enter your desired username
- Enter a password
- Click ‘Next’
- You’re ready to go!
#2. Set Up a Property in Google Analytics
When you start using platforms like Google Analytics, you’re going to hear the word ‘property’ thrown around a lot. But don’t fret – this isn’t anything to do with the house you live in, but instead refers to your website as a whole – although it could also refer to a blog or an app as well. Each property that is set up on Google has a unique ID, which is what makes it distinguishable from other properties.
In order to set up your property (website) on Google Analytics, you’ll need to follow a number of simple steps.
- Open Google Analytics whilst logged into your Google account
- In the left-hand corner of the screen select ‘Admin’
- In the ‘Property’ column press the blue button that says ‘+ Create Property’
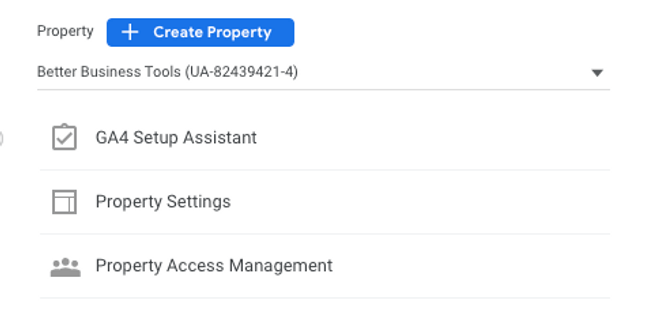
- Input your property name – make sure this is something easily identifiable
- Select ‘Show Advanced Options’
- Turn on ‘Create a Universal Analytics property’
- Enter the URL of your website
- You’ll be presented with an option to set up both a Google Analytics 4 property and a Universal Analytics property – it is worthwhile doing this, as it gets you set up and ready to use these platforms, should you need to in the future
- Click ‘Next’
- Input the requested information: this includes how many employees are in your business, and how you intend on using the Google Analytics platform
- Click on ‘Create’
- Agree to the Terms of Service and click ‘Finish’
Once you have added your property to Google Analytics, you’re now ready to move on to getting set up the platform, and importing data from your website.
Top Tip
Set Up Goals or Conversions Early On: One of the critical features of Google Analytics is its ability to track conversions (in GA4) or goals (in Universal Analytics).#3. Filter the Data You See in Google Analytics
To see the information that’s most important to your business, you’ll want to create a view. This is easy to do – simply follow these steps:
- Select ‘Admin’ on the left-hand menu
- In the ‘View’ column select ‘+ Create View’
- Select ‘Website”
- Type in a name for your view
- Select your reporting time zone
- Select ‘Create View’
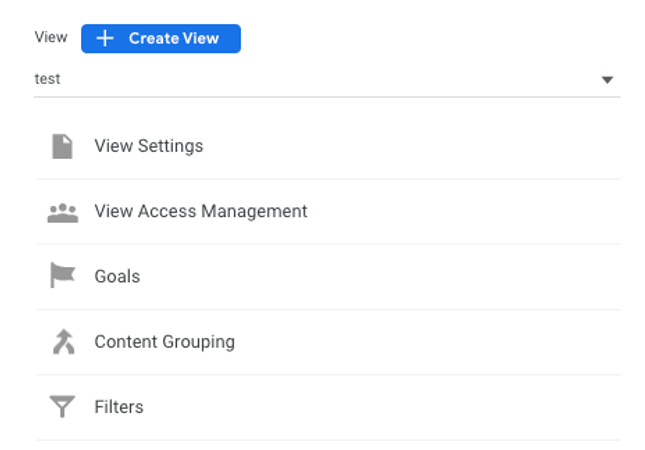
You can also make edits to your view – such as changing its name, or selecting which currency should be used in your reports – by:
- Selecting ‘Admin’
- In the ‘View Column’ ensure that the drop-down has selected the view you want to edit
- Select ‘View Setting’
- Make any required edits
- Select ‘Save’
You can typically create up to 25 views on each property, although you may be able to create more if you talk directly to Google. Each view can be used to highlight different information, which is especially useful for businesses with multiple departments. For example, members of the finance department are likely to want to see different website information than those in the marketing department.
You can toggle between your view by selecting the ‘all accounts’ box in the top left-hand corner, selecting your account, picking your property, and then choosing the view you want to see.
#4. Get Your Google Analytics Tracking Code
For Google Analytics to be able to pull data from your website and feed it into your reports, you’ll need to add their tracking code to your website. This is fairly simple to do, but does require a small amount of knowledge of coding, so you know where the code should be placed.
Before you can include the code in your website, though, you’ll need to get hold of it. To locate your unique tracking code, follow these steps:
- If you aren’t already, sign in to your Google Analytics account
- Click on ‘Admin’ in the bottom left-hand corner
- Select the account you need code for from the drop-down menu on the ‘Account’ column
- Select the property you need code for from the drop-down menu in the ‘Property’ column
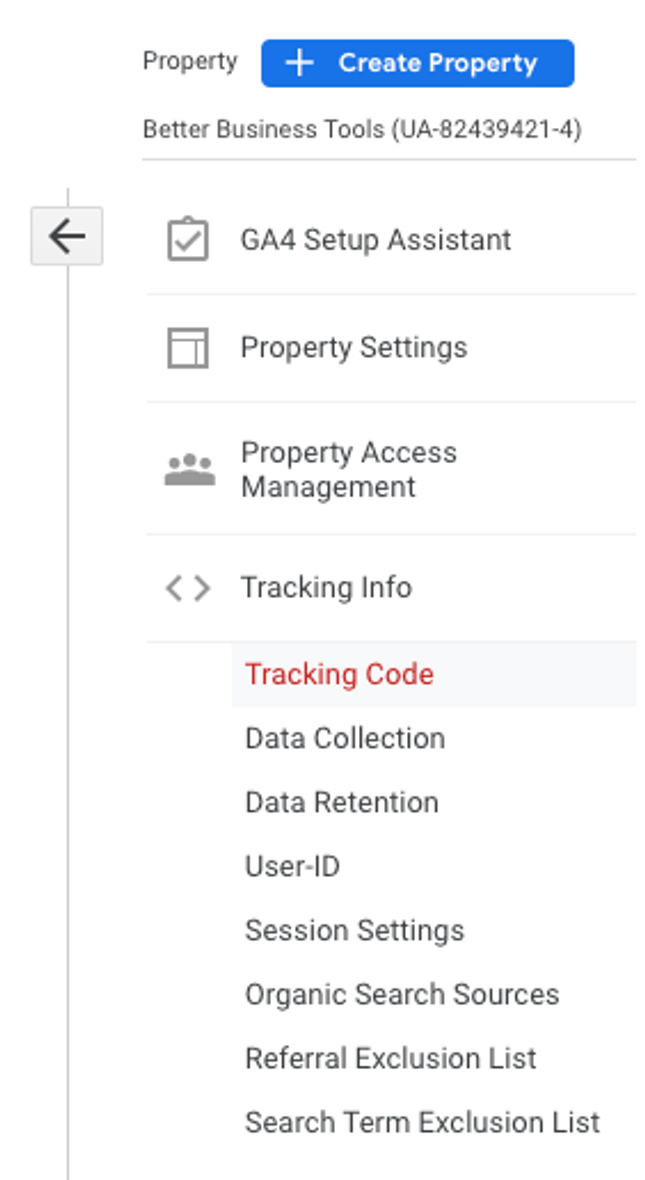
- In the ‘Property’ column select ‘Tracking Info’ and then ‘Tracking Code’
- Your tracking code is in the top left-hand corner, and your global site tag is highlighted in a box below
#5. Add the Tracking Code to Your Website
Once you have your tracking code, you’ll need to add it to your website. Whether you require your tracking code or your global site tag will depend on the platform you use. For example, a typical custom-built website will require you to manually add the global site tag to each page you want to track. On the other hand, a website platform such as Wix, Shopify, or BigCommerce will usually allow you to simply input your tracking ID, automating its input across your site on your behalf.
Here’s an example of how you would add your tracking code to your Shopify store:
- Copy your tracking ID from Google Analytics
- In a new tab open your Shopify Admin
- Select ‘Online Store’ and then ‘Preferences’
- In the Google Analytics section, paste your code
If you have a custom-built website, you’ll need to manually go into each page where you want to track data and add your Global Site Tag after the <head> tag on each page.
Top Tip
Leverage Google Tag Manager: Google Tag Manager can simplify the process of adding the Google Analytics tracking code to your website.#6. Verify the Tracking Code
Once your tracking code is in place, you need to verify it. This can be done by:
- Logging into GA and selecting the website you want to check
- Navigate to “Admin”
- In the “Property” column click “Tracking Info”
- Select “Tracking Code” from the drop-down menu
You will then see a tracking status. If the code is not installed properly you will see one of these statuses:
“Tracking Not Installed”
This indicates that the Google Analytics tracking code is not detected on your website. It means that the tracking code hasn’t been implemented correctly or hasn’t been added to all the necessary pages.
Go back to your website and ensure the tracking code is correctly installed on all relevant pages.
“Receiving Data”
This means that the Google Analytics tracking code is correctly installed on your website, and data is being received and processed by Google Analytics.
So, you should soon be able to view and analyze the collected data in your reports.
“No Data Received”
This status usually appears when you have just set up Google Analytics, and there hasn’t been enough time for data to be collected. It may also indicate that there is a delay in data processing.
Wait 24-48 hours to see if data starts to be received. If not, you may need to check that your tracking code is correctly installed and there are no technical issues blocking the retrieval of data.
You may also use the “Real Time” report in GA to verify that tracking is working. To do this simply open GA and in the left-hand menu click “Real-Time” and then “Overview”. This should show live users on your site. If you cannot see anyone (but you are on your site yourself) this may indicate that your tracking is not working.
Third-party browser extensions or tools like Google Tag Assistant can also help you verify your tracking code. Simply install the tool (such as Google Tag Assistant) on your web browser and navigate to your website. The tool will then scan your website and analyze the tracking code implementation – providing you with feedback.
If you find that your tracking isn’t working, this may be for several reasons. Common issues include:
- Incorrect code placement. Fix this by ensuring your code is pasted just before the closing </head> tag.
- Conflicting plugins or scripts. Fix this by disabling plugins or scripts temporarily to identify potential conflicts.
- Theme and design updates. Fix this by checking tracking code is still live after updates.
- Cache and cookies issues. Fix this by clearing your browser cache and cookies then revisit your website to see if the code if working.
#7. Understand Basic Google Analytics Reports
Now your tracking is live and ready to use. It is time to dive into actually using your Google Analytics to improve your website and business. To do this, you will need to understand the basics.
Real-Time Report
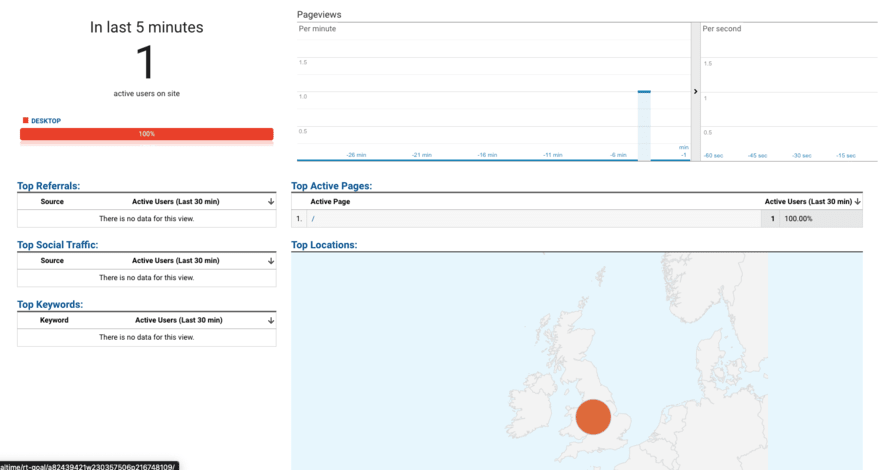
The real-time report lets you track live website visitors on your website. Sure, this may seem a little, um…creepy, but it is also really helpful in understanding how people engage with your site.
Your real-time view can be found on the left-hand menu. Here you will be able to see the number of active users, their geographic locations, and the specific pages they are viewing in real-time.
Audience
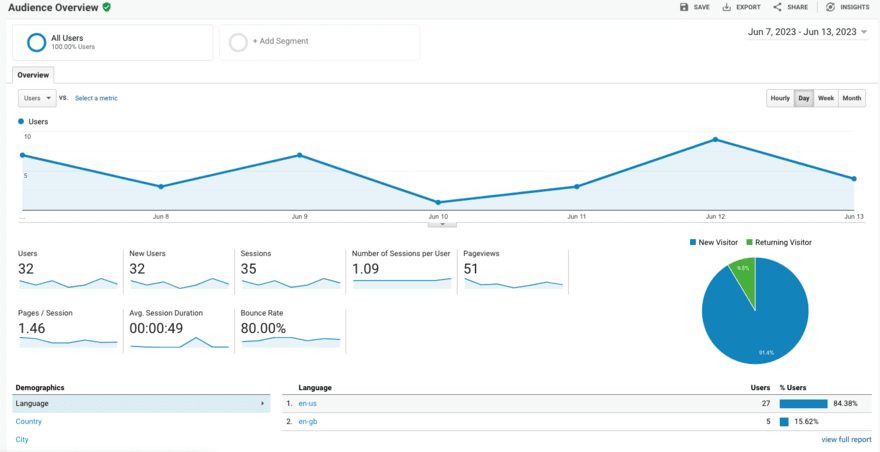
The audience tab on GA offers you valuable insight into your website visitors. It allows you to dive deep into different areas of your audience such as demographics, interests, geographical information, behavior, and the technology they use.
Ultimately, this report helps you understand your audience better, tailor your content and marketing strategies, and optimize your website for improved user experience.
Acquisition
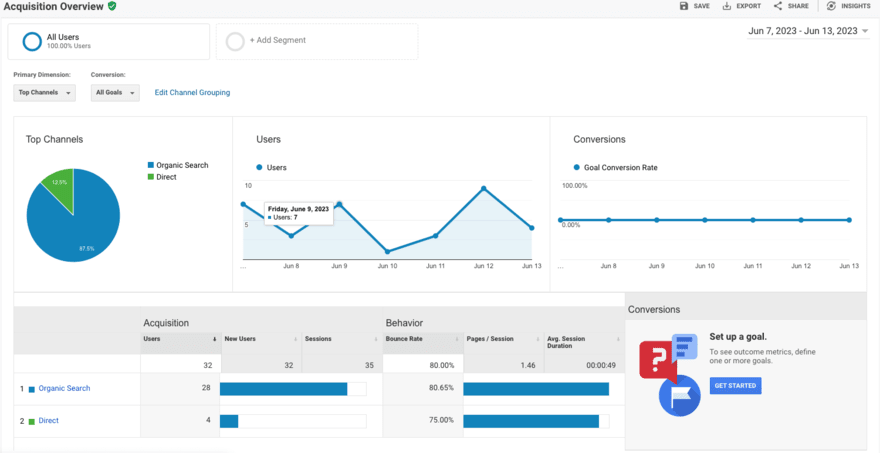
The acquisition report in GA allows you to understand how users have discovered your website. For example, it offers data on whether visitors come through organic search, referral sites, social media, direct visits, or paid search.
Using the acquisition tab will help you with your most valuable acquisition channels, identify the effectiveness of your marketing activities, and make changes to improve traffic flow to your website.
Behavior
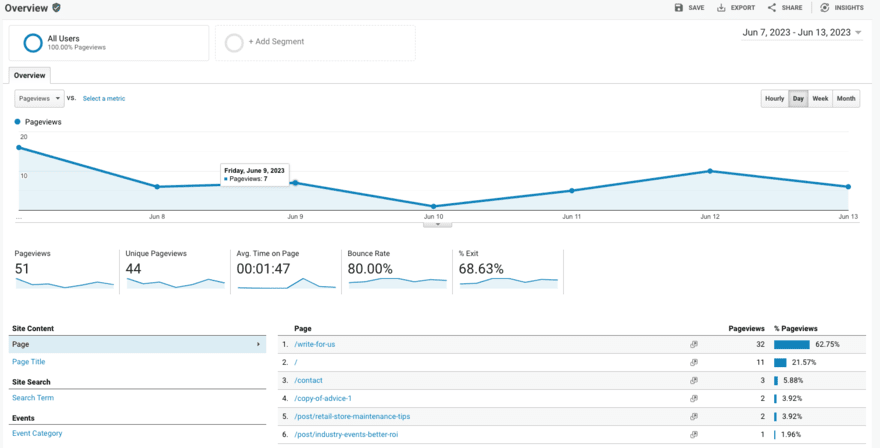
The behavior tab on Google Analytics will help you get to grips with your website content, speed, search actions, and events. The reports in this section will provide you with insight into how users interact with your website, which pages they visit, what they search for, how quickly the site loads for them, and the events they engage with.
This information can be used to help optimize website performance, help you identify popular content, improve your user experience, and enhance overall engagement on your site.
Conversions
Conversions are valuable actions that visitors take and are arguably the most important part of your website. The conversions tab on your Google Analytics is a helpful tool for tracking and analyzing your website’s goals, ecommerce transactions, and other important conversions.
For example, conversions will allow you to see when someone completes a purchase, submits a form, or signs up for a newsletter. So, this report will help you measure the effectiveness of your conversion strategies and optimize your website for better results.
Top Tip
Apply Annotations in Your Reports: Annotations allow you to note changes you made on your website.#8. Set Up GA4
Google Analytics 4 (GA4) is the newest version of Google Analytics. This newer version offers advanced tracking and measuring capabilities, helping you get more from the platform.
For example, this latest update offers a holistic view of user behavior across multiple platforms and devices such as websites, mobile apps, and even offline interactions. GA4 also introduces event-based tracking, machine learning-powered insights, and enhanced data privacy features.
There are many benefits to using GA4. Most importantly it will help businesses to gain a deeper insight into customer journeys, improve customer targeting, and help them make data-driven decisions.
Standard Universal Analytics properties stopped processing data on July 1 2023.
Top Tip!
Parallel Tracking: You can run GA4 and Universal Analytics concurrently on the same website.Find Out More
Check out our guide on How To Set Up GA4 for specific steps on making the switch to the latest version of Google Analytics.
Adding Google Analytics to a Website: Summary
In this guide, we’ve provided you with the eight steps you need to take in order to set up Google Analytics for your own website. Once you’ve completed these steps, it’s worthwhile testing them to ensure that they’ve worked properly. This can easily be done by going to ‘Admin’, then under the ‘Property’ column selecting ‘Tracking info’ and then ‘Tracking code’. On this page you can select to ‘send test traffic’ to your page, and make sure everything’s looking tip-top.

Leave a comment