How to Migrate from Magento to Shopify in 7 Steps
If you click to purchase a product or service based on our independent recommendations and impartial reviews, we may receive a commission. Learn more
Is the Magento to Shopify Migration a Simple Task?
Migrating your online store is like moving house. You want to transport all your stuff from Magento to Shopify without breaking or losing a single piece of data. We’re here to explain exactly how to seamlessly move sites with our step-by-step guide.
Migrate from Magento to Shopify in 7 steps:
- Set up a Shopify Account
- Create a Backup of Your Store
- Download the Store Import App
- Export Data From Magento
- Import Data to Shopify
- Review Imported Data
- Design Your New Shopify Store
1 Set up a Shopify Account
An easy start! Visit Shopify and click ‘Start Free Trial’ to try the platform for 14 days without spending a single cent.
The trial period allows you to familiarize yourself with the powerful ecommerce tools before making a commitment, but you’ll need to sign up to a paid plan once the period is over. The main pricing plans are:
- Basic Shopify ($29/month)
- Shopify ($79/month)
- Advanced Shopify ($299/month)
Basic Shopify has all the features you need for starting a new business, Shopify offers a wider choice of tools which makes it ideal for growing your business, while Advanced Shopify has advanced tools to help scale your business to the next level. None of the plans have a setup fee, just one all-in monthly payment.
2 Create a Backup of Your Store
Before making the great migration from Magento to Shopify, you need to make sure your store’s data is safe and secure. Just imagine if the migration falls apart and you lose all your customers, product, and payment details!
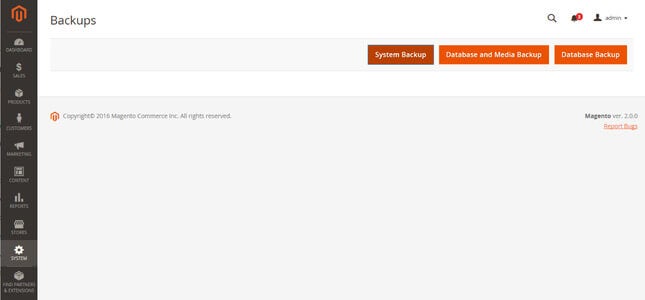
To create a backup of your Magento store, go to the Admin sidebar, then ‘System’ >‘Tools’ >‘Backups’. From there, choose the type of backup you want to create:
- System Backup (a complete backup of your database and file system)
- Database and Media Backup (your customer information, and product photos etc)
- Database Backup
You may already benefit from automatic backups via your hosting provider, in which case you won’t need to worry too much about creating a backup of your store, but you can never be too careful!

3 Download the Import Store App
Shopify’s App Store is filled with thousands of wondrous apps, but which can help you with the move? For completing your Magento to Shopify migration, we recommend using ‘Import Store’.
By downloading this app, you’ll be able migrate your product and customer data to Shopify without a fuss, as long as you’ve exported your data from Magento (more on that soon!).
From your Shopify admin page, simply click ‘Apps’ then ‘Import Store’ and follow the instructions. If this app doesn’t tickle your fancy, you can also choose from these other highly rated migration apps:
4 Export Your Data from Magento
Now it’s time to pack up your data into boxes and load them onto the removal van, ready for your new home.
Or as we experts like to call it: exporting your unique customer and product data onto a file so that other applications such as Shopify can understand it.
Exporting your data on Magento can be done through the same Admin Sidebar you used to create a backup of your store. The exportation process is simple:
- Click ‘System’ on the Admin sidebar, then ‘Data Transfer’ > ‘Export’.
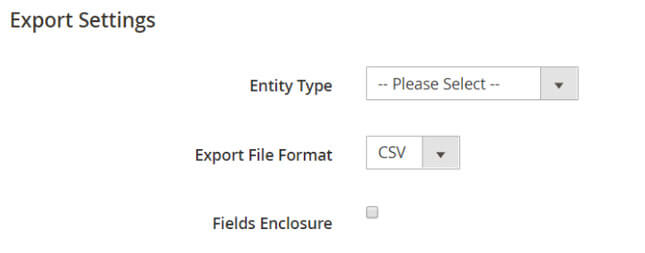
- Within the Export Settings, select whether your Entity Type is Products, Customers Main File, or Customer Addresses.
- Select ‘XML’ in Export File Format if you’re using the ‘Import Store’ app, or CSV if you’d like to import the data manually, or use an alternative app like ‘Transporter’.

If you want to export products, customer main file, and customer addresses, you’ll need to repeat the process for each one. Once that’s all done, you’ll now have your data on a spreadsheet that can be easily digested by Shopify’s software, making the whole migration process seamless.
5 Import Your Store Data to Shopify
Your data is now ready to be imported into Shopify. Almost there! Again, the importation steps are easy to follow:
- Visit the Shopify admin page then click ‘Apps’ > ‘Import Store’.
- Select Magento from the drop-down menu.
- Under ‘Upload Files’, click ‘Add file’ and select your exported files.
- Select the Magento file that you downloaded
- To finish, click ‘Continue import’ then ‘Import’.
If you’re unable to save your data as XML (which is needed to use the Import Store app we recommended), then you’ll need to use one of the other apps we suggested in Step 3, or migrate the data manually without an app.
6 Review Your Imported Data
It’s always worth checking the removal van or under your old couch for any forgotten or missing items. The same goes for imported data. You need to review what you’ve imported to make sure there are no errors or missing pieces.
Shopify makes it super simple to review and update your imported data. For starters, if some of your products or customers didn’t import successfully, then you can add them manually from the ‘Products’ or ‘Customers’ option on the admin page, depending on what you need to add.
Some other issues you might encounter during your Magento to Shopify migration include:
- Successful import with minor changes to your data – you can edit the imported information manually by clicking View items on your import summary.
- Historical orders – your previous orders data from will be sent to Shopify’s Archived
- Bundled products failed to import – we recommend installing the Bundle Products and Discounts app to rectify this manually.

- Products imported but not published – if you had some products on Magento set to ‘hidden’, then you’ll need to reset the product visibility on Shopify if you want your customers to find them.
- Imported products have no dimensions – simply add the correct dimensions from the product description page
- Product variants failed to import – if an imported product displays information about its size but not its color, then it wasn’t imported successfully. You’ll need to import that product manually using the method mentioned above.
7 Design Your New Shopify Store
Now we’re going from data to design. Shopify is much easier to customize than Magento, providing ready-made themes and plenty of visual cues to help you create a beautiful online store to suit your business.
Shopify has 10 free and 64 premium themes to choose from, costing anywhere between $140 and $180 each. Each theme is mobile responsive which means your online store will look great on mobile and desktop.

Want to make your creative life a lot easier? We recommend downloading the DragDropr app to integrate drag-and-drop functionality to your Shopify editing experience. This app will enable you to create, change, and edit over 50 landing pages and more than 200 content blocks such as product videos or contact forms. Installing this app allows Shopify to compete with Wix in terms of creative flexibility!
How to Migrate from Magento Shopify: Recap
Migrating your store from Magento to Shopify doesn’t need to be tricky. We’ve taken you through all the steps, and shown you the issues to look out for when exporting and importing your data. Let’s recap the process:
Magento to Shopify Migration in 7 steps:
- Set up a Shopify Account – enjoy the 14-day free trial.
- Create a Backup of Your Store – backup your databases in case your migration goes wrong.
- Download the Store Import App – visit Shopify’s app store to make the process more seamless.
- Export Data From Magento – place your data onto an XML or CSV file.
- Import Data to Shopify – load your files onto Shopify with the click of a button.
- Review Imported Data – check for importation errors like missing products and enter products manually.
- Design Your New Shopify Store – create a stunning Shopify storefront.
As long as you follow our steps (and make sure you’ve backed up all your data on Magento), you can shut up shop and start the moving process without too much stress. Happy moving day!


4 comments