What is Shopify and How Does It Work?
If you click to purchase a product or service based on our independent recommendations and impartial reviews, we may receive a commission. Learn more
 Shopify is the ecommerce platform on everyone’s lips at the moment and for good reason. It has the broadest range of sales tools on the market, and it’s really easy to use.
It makes building a powerful and prosperous online store an absolute breeze so that any business owner can get online in no time – especially if you use some of the tips and tricks we’ve included in our guide below!
If you’re looking to join the 640,000 businesses already using Shopify, you’re in luck. We’re going to show you how to do just that in 9 easy steps. We’ll be using our many years of website-building experience to cover everything from signing up to hitting that final publish button, with some handy tips we’ve picked up along the way from chatting to other Shopify users.
What Is Shopify?
Shopify is a dedicated ecommerce website builder that helps people build their very own online store. It’s also the website builder with the largest market share of 38.2%, making it a popular choice globally.
You don’t need mad tech skills, you don’t need a bottomless budget, and you don’t need to hire anyone to make your dream a reality. This makes Shopify a quick and relatively affordable way to create an online store.
Who Can Use Shopify?
Anyone can use Shopify, whether you’re a first-time seller or a multi-million dollar business like Harry’s (just one of Shopify’s many satisfied customers). All you need is an idea, something to sell, and an internet connection – you can have an online store up and running in no time.
With over 8,000 apps, specialized features such as inventory tracking and shipping tools, and a range of plans to choose from, Shopify is a powerful platform. It can be used by stores of any size, and it’s extremely scalable.
Expert Opinion – Markus Goess-Saurau, Co-Founder of Sönd
 ‘Creating a Shopify store is really straightforward and can be designed and launched within a day. It doesn’t require any technical knowledge and there are lots of beautifully designed themes to choose from. What’s particularly useful is the ability to change the design with a template theme that can be updated as and when necessary.
Shopify also boasts a number of “out of the box” SEO benefits that help drive the growth of your store from day 1 which makes it the best option for small businesses in my professional opinion.’
You can also read our Shopify review if you want a more detailed look at Shopify’s pros and cons, or get inspiration from our list of the best Shopify store examples from real-life business owners!
Sign Up
Quick Overview
- Signing up with Shopify is quick and simple
- They offer a 3-day trial
- Enter a few details to get started
The first step is the easiest: head to Shopify.com. The homepage has a number of ‘Start Free Trial’ buttons so go ahead and click one of those to begin. One of the best things about Shopify is that its ‘free trial’ really is free. You don’t need to submit any payment details to get started – just your email address!
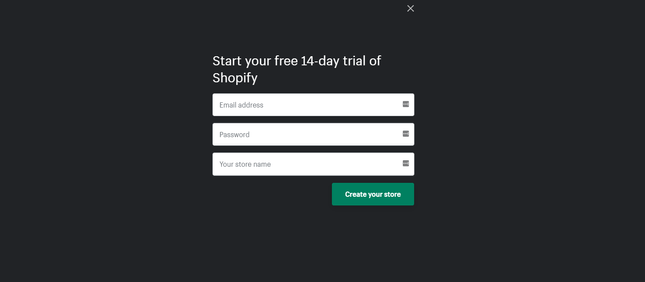
As well as your email address, you’ll need to choose a password and – most importantly – a name for your new store. This must be unique so get creative because Shopify won’t allow duplicates. It will provide you with some close alternatives though if your first choice has already been taken.
Once you’ve filled these in, you can click ‘Create your store’.
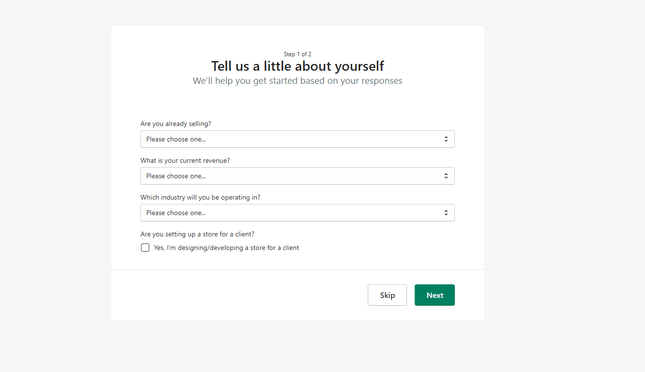
You’ll need to provide a few more details before you can move on to the fun stuff. These include whether you’re already selling, what your current revenue is, and what industry you’re in. There are drop-down menus for each, giving you a range of options to choose from whether you’re a fully-fledged seller or an ecommerce novice.
The last thing to do in the signup process is to enter your business address. This will help with your payments further down the line. If you don’t have a permanent business address yet, don’t panic. This can be changed later on.
Once you’ve done this, press the ‘Enter my store’ button and get ready to watch your website take shape.
Add Products
Quick Overview
- Add products in a few steps
- Make sure your product photos, descriptions, and meta-descriptions are clear
- Creating a collection helps with navigation and organization
Once you’ve filled in your details, you’ll be directed to your admin dashboard. This is the command center for your online store and it’s where you’ll make all of the important decisions about running your site.
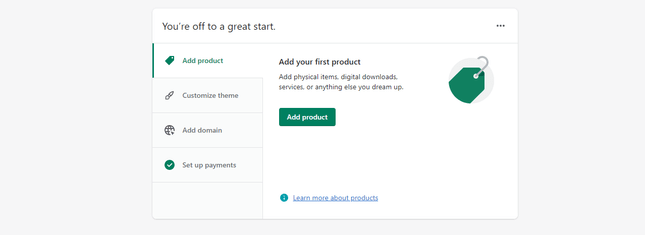
You’ll find a clear navigation menu on the left, along with a handy setup box in the middle. This contains the four main tasks you’re going to need to complete to get your store up and running.
We’re going to start with the backbone of any shop – the products. Just click the green ‘Add product’ button to start selling physical, digital, or service items, from art to makeup.
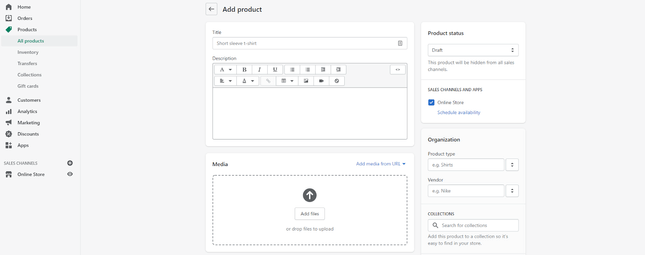
Adding products with Shopify is really easy. Pressing the green button will take you to a product upload page. Here you can name your items, describe them, upload your product photos, and set their prices. Customers want as much information about a product as possible before they commit to buying, so it’s important that your descriptions and photos are high quality and do your items justice. Here’s what one user had to say in our testing:
‘In the backend where you add your products, it’s fairly easy to do, there is plenty of information and everything you could imagine that you would want to edit about that product is there and easy to find.’
Further Information
If making all of these decisions about your products is bringing you out in a cold sweat, don’t panic. We’ve got some guides that will make it a lot easier!
- Discover How to Take Product Photos that impress customers and boost sales.
- Our handy guide walks you through How to Price a Product to make sure you profit from your store.
- Need a hand with your product descriptions? Check out our guide on How to Write Product Descriptions for some expert tips!
If you scroll further down the page, there are some extra fields to fill in, like the barcode, weight, and size variants. These might not be as exciting, but they’re important for shipping and keeping your inventory organized.
Speaking of your inventory, Shopify lets you check the status of your overall stock in one convenient place. Selecting the ‘Inventory’ option in the sidebar will direct you to a page where you can track all of your items and their stock numbers.
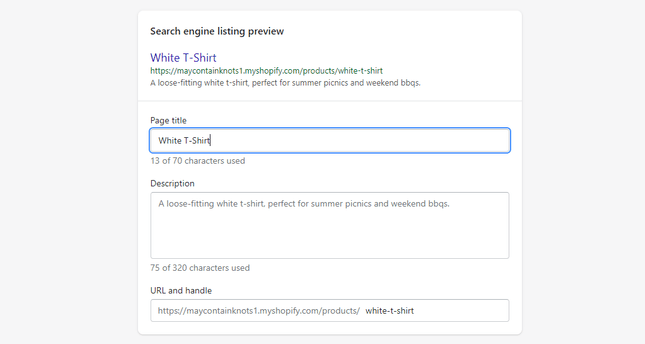
The final thing to check before hitting the save button and adding your item to your store is your search engine preview. This shows you how your product will appear on a search engine page.
These snippets of copy – or meta descriptions as they’re officially known – can affect where your store ranks on a search engine results page. Because of this, you want to get them right. It can sound more intimidating than it is but if you need help, check out our article on how to write meta descriptions.
To change your preview, click on the ‘Edit Website SEO’ link in the upper-right corner of the box. This will reveal a series of text boxes where you can make your adjustments.
We think these are particularly useful because they help your customers find what they’re looking for, but they also keep your store organized as your business and inventory grows. We recommend using them if you want a more professional and streamlined interface.
[caption id="attachment_51316" align="aligncenter" width="450"] You can put collections anywhere on your site. The Collections page helps you to maintain and keep track of them.[/caption]
[caption id="attachment_51320" align="aligncenter" width="450"]
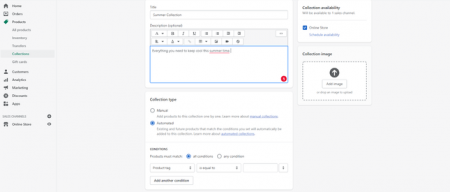 Adding a collection is similar to adding a product – you’ll need to give it a name and a description, but you’ll also need to decide if it’s a manual or automated collection.[/caption]
[caption id="attachment_51354" align="aligncenter" width="450"]
 Use the products page to add items to a specific collection[/caption]
Creating a collection is just as easy as adding a product. In the left-hand sidebar, click on the ‘Collections’ option. This will take you to a page displaying all of the collections you currently feature. Click the green ‘Create collection’ button in the top right.
You’ll then need to name your collection and add a description, similar to when uploading a product. You can even add a cover image if you like.
When creating your collection, there are two different types to choose from: a manual collection, or an automated one.
With an automated collection, certain products will be automatically added when they’re uploaded. But for this to work, you’ll have to set some ground rules so Shopify knows which items belong where. You can set these conditions below the collection type tickboxes, instructing the platform to look out for certain criteria that mean a product fits within a specific collection. This is well-suited to something like a new arrivals section of your store.
Creating a manual collection means you’ll have to add the products yourself. Go to the product page and select the item you want to add. Next, click on the ‘More Actions’ drop-down menu and select ‘add to collection’. Choose the correct collection and press save.
Collections also have a search engine preview, so make sure you check your meta title and meta description to give yourself the best chance of ranking well and attracting visitors.
‘Loved the option to add products to the collection either manually or automatically (based on conditions) – Shopify thinks one step ahead for the user. I also liked the SEO prompt to add a description.’
Customize Theme
Quick Overview
- Shopify offers free and premium themes in their theme library
- Make sure to try the demo before making a choice
- You can change your theme at any time
- The theme editor has plenty of tools that make it easy to customize the site to your needs
Choosing your theme
The next task on the list is one of our favorites – picking out a theme for your website.
When customizing your store’s design, you have three options to choose from. You can stick with Shopify’s signature theme, ‘Debut’, choose one of its nine free themes, or pick from its variety of paid templates. These range in price from $140 to $180.
Although this is pricey, these premium themes tend to come with extra functionality and a more unique design, so the cost is worth it if you’re planning to really invest in your online store and take it to the next level.
Top Tip:
If you’re not sure whether you need a premium theme or not, we’d recommend starting with one of Shopify’s free templates. These still have all the features you’ll need but without the additional cost. Just because you start with a free theme doesn’t mean you can’t invest in a paid template later on. You can change your site theme at any time, giving you some extra flexibility.
Choose Your Theme
Clicking on ‘Customize theme’ will direct you to your theme management page. Here, you can see the template you’re currently running and open the theme library, where you can browse the many design options Shopify has on offer.
Clicking on any template will give you a quick snapshot of all the features it offers, as well as allowing you to see a full demo. We recommend checking this out before making any decisions, so you can test the theme out for yourself.
When you’ve chosen your template, click ‘Add to library’. From here, you’ll be able to customize it to suit your brand and products.
Customizing your theme
Shopify’s customization tools are fairly straightforward. Next to each template in your library is a green ‘Customize’ button. Click this and you’ll be taken to your store’s blank homepage.
Good to know…
Next to the customize button is an ‘actions’ drop-down menu. This allows you to preview, publish, rename, and duplicate your theme. You can also edit the code and the language of your website. The duplicate option is especially handy when you’re making big changes to your site. This way, you’ll have a backup if things go wrong, or you prefer your store as it was before.
Customize Your Theme
The template editor is split into two parts. On the left-hand side, you’ll find each element of the page broken down into editable sections. On the right is a preview of what your changes will look like in real life.
This sidebar allows you to edit text and upload pictures with the click of a button, but it also lets you make changes to the page’s overall layout. Clicking on the eye symbol will remove various elements, hiding them from view. But don’t worry – they won’t be gone forever. Clicking the symbol again will bring them back.
If you’re looking for more creative control over the way your store looks, scroll to the very bottom of the toolbar. Here you’ll find two extra menus, theme settings, and theme actions. If you want to change up your color scheme or typography, add social media icons or dig into your theme’s code – for instance, to get rid of the “Powered by Shopify” branding – this is the place to go.
Although you can make the majority of changes in the customization editor, you’ll need to go back to your administration dashboard if you want to add additional pages. In the left-hand sidebar, select ‘pages’ under the ‘Online Store’ tab. Here, you can expand your site with a blog, sizing guides, FAQs, and more.
Further Information
- Learn all about How to Design a Product Page in our expert guide.
- Wondering which font is best for your store? Find out in our guide How to Pick the Perfect Font For Your Website
- Make sure your color scheme is on-point in our guide How to Choose a Good Color Scheme
- Or read our Shopify themes review.
Add a Domain
Quick Overview
- Opting for a paid domain will boost professionalism
- You can buy a new domain through Shopify
- It’s also easy to connect an existing domain
Now that you’ve added your products and customized your theme, things are moving along nicely! But before your website can go live, it needs a name so your customers can find you.
You may have heard people say that a website is a window into your business – well, we believe a domain name is a window into your website. It’s the first thing your customers will see, so it’s important to find the perfect URL for your online store, which will reflect and strengthen your brand.

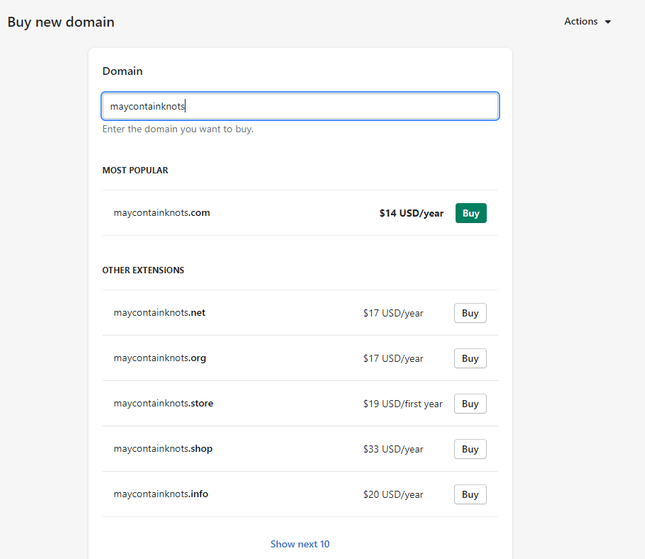
When you create your Shopify store, it’ll come with the Shopify subdomain ‘.myshopify.com’. Sure it’s free and it keeps costs down, but it doesn’t look too professional.
To jazz up your online store, you can either buy a new domain or connect an existing one. If you want to purchase a new domain, Shopify has a search bar to check if your choice is available and suggests other extensions like ‘.net’, or ‘.shop’ if it’s not. Costs may vary but usually start from $14 per year.
But what if you already have an existing domain from a third-party site? No worries! It’s a little more technical but not impossible. Follow the steps below to transfer this over to your store.
- Navigate to the ‘Domains’ page from the sidebar navigation menu
- Click ‘Connect existing domain’ in the top right corner
- Enter your domain name into the search bar and click next
- Log in to your account with your third-party domain provider
- Alter your DNS settings so that your A record or @ points to Shopify’s IP address: 23.227.38.65
- Save the A record
- Change your subdomain CNAME record to point to yourstorename.myshopify.com – this is just your Shopify link, which you can find on the domains setting page, under ‘domain name’)
- Save the CNAME record
- On your Shopify ‘Domains’ page, change your primary domain to the one you’ve connected and ‘Redirect all traffic to this domain’


Good to know…
If you have a domain with GoDaddy, Google Domains, or 1&1 IONOS, you can automatically connect them without following the steps above. Instead, click ‘Connect existing domain’ and enter your existing domain. On the next page, select ‘Connect automatically’. A popup window will appear and you can log in to your domain provider. Click ‘Connect’ to complete the process. If you run into problems with this, you’ll need to follow the steps above to connect manually.
Further Reading
- Check out our What Is a Domain Name? Beginner’s Guide for a more detailed introduction to domain names.
Enable Payments
Quick Overview
- Use Shopify Payments to start selling quickly and easily
- Select various payment gateways like PayPal and Amazon Pay if you prefer
- Make sure you’re set up to charge taxes correctly if you need to
- Run a test order before you set your store live
Now that you have a fully stocked, awesome-looking online store, it’s time to start making money. Helpfully, Shopify is the only website builder to provide its own payment gateway: the aptly named ‘Shopify Payments’.
With Shopify Payments, there are no transaction fees. However, if you’d like to use other gateways – such as PayPal, Amazon Pay, or one of the 100+ other options – you will be charged per transaction.
Good to know…
If you do choose to use alternative payment gateways, it’s worth noting that you’ll have to pay the provider’s transaction fees, on top of additional charges from Spotify. These vary depending on the plan you select. The basic plan takes 2%, the Shopify plan 1%, and the Advanced Shopify plan 0.5%.
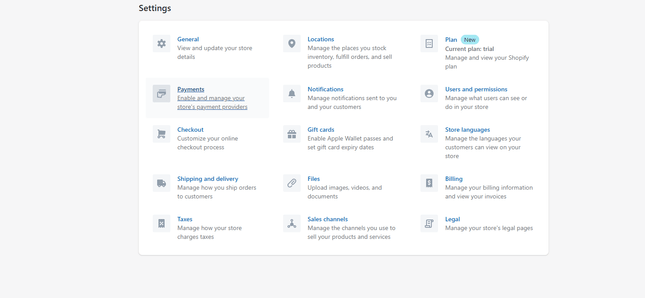
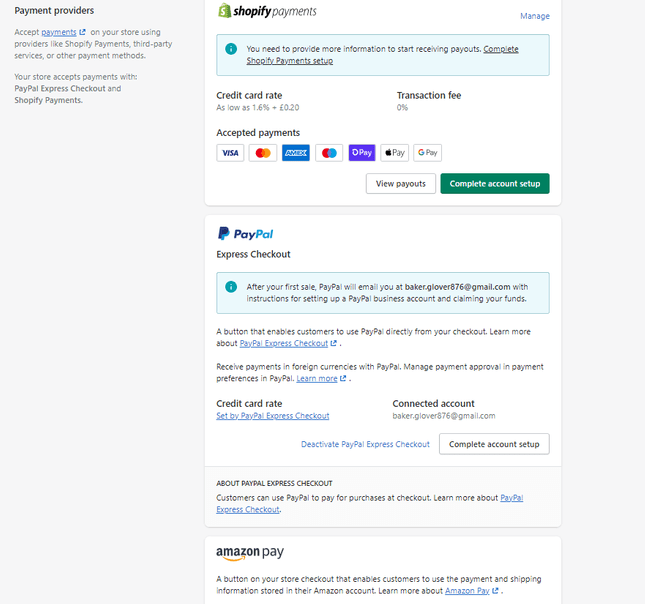
To get to the payment page on your Shopify dashboard, click ‘Settings’ at the foot of the navigation menu, and then the ‘Payment’ icon. Here, you’ll be able to access all the steps necessary to set up your store with each different payment gateway. This will usually involve setting up an account with the external provider and connecting it with your Shopify store.
It can also depend on the products you’re selling. For example, you probably won’t need to charge taxes on digital items, but you probably will if you’re selling physical products.
Registering with a tax agency will give you a sales tax ID. Once you have this, follow the steps below to get your taxes up and running. We’ve also included a gallery of step-by-step pictures to help with this.
- Go to ‘Settings’ and then ‘Taxes’
- Select the United States, and then ‘Set up’
- Click ‘Collect sales tax’ in the ‘Sales tax collection’ section
- Select the state you’re registered in and then enter your Sales tax ID. If you don’t have one yet, leave it blank. You can always come back and add this in later
- Click ‘Start collecting sales tax’
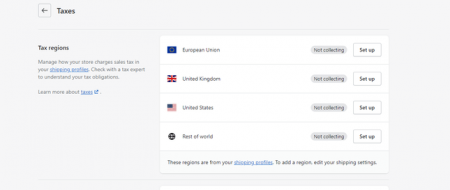 You can set up taxes for various regions across the world but make sure to seek advice before doing so if you’re unsure about tax processes in these locations.[/caption]
[caption id="attachment_51371" align="aligncenter" width="450"]
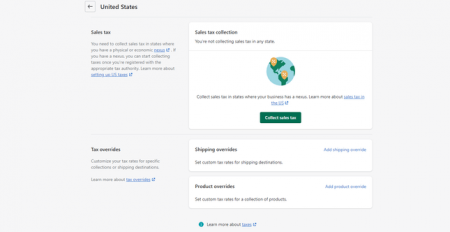 Select Sales tax collection and then Collect sales tax to begin the process of setting up your taxes.[/caption]
[caption id="attachment_51375" align="aligncenter" width="450"]
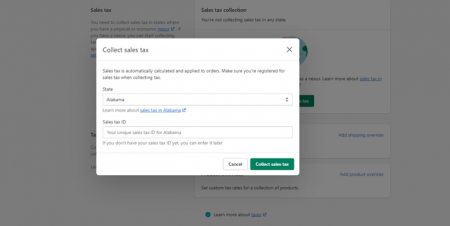 This is the final step. Once you’ve selected your state, hit the green button and you’re all set![/caption]
[caption id="attachment_51379" align="aligncenter" width="450"]
 You can set tax conditions for each product when you upload them, after providing your photos, description, and pricing.[/caption]
Good to know…
When you add products, make sure to tick the box labeled ‘Charge tax on this product’ if it’s relevant. If your items have variants, you can also select this option for each variation too.
There are two ways to do this:
- Through Shopify Payments test mode (for Shopify Payments users only)
- Through Shopify’s Bogus Gateway
If your main payment provider is Shopify Payments, using its test mode is the best way to check the process works.
To do this, go to your ‘Payment providers’ in settings and select ‘Edit’, in the Shopify Payments section. Check the ‘Use test mode’ button and click ‘Save’. This way, you can ‘order’ from your shop like a real customer and double-check that there aren’t any issues with the system. Just remember to disable this when you come to opening your site up to the public.
[caption id="attachment_51383" align="aligncenter" width="450"] Click on ‘Manage’ in the Shopify Payments section and you’ll find the test mode at the bottom of the page[/caption]
[caption id="attachment_51387" align="aligncenter" width="450"]
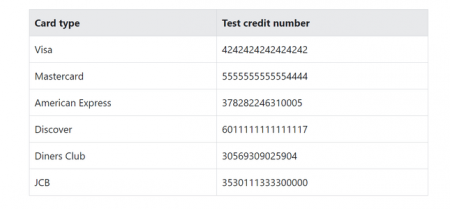 You won’t be able to use a real credit card when testing, so use any of the above numbers to simulate a purchase.[/caption]
Good to know…
Make sure that when you carry out the test, your transaction is greater than $1, otherwise, it won’t work correctly.
If you want to check a third-party payment provider, you’ll need to use the Bogus Gateway instead of the test mode.
To do this, deactivate any live payment providers. Click ‘Manage’ and then ‘Deactivate’ at the bottom of the page to do this. Return to the main payments page and scroll down to ‘Choose third party provider’. At the top of this page, you’ll see an option called ‘Bogus Gateway’. Select this and then place an order in your store as a customer would. Check the gallery below for the details you’ll need to enter when making your ‘purchase’. Similar to Shopify’s test mode, make sure you deactivate the bogus gateway when you’re done.
Testing Third-Party Payment Providers
Further Information
- Interested in Shopify payments? Read our detailed review.
- See how Shopify fares against other ecommerce platforms with our Shopify vs WooCommerce article.
Add Shipping
Quick Overview
- Manage your shipping process in the ‘Settings’ tab
- There are a multiple shipping options available
Shopify makes it easy to customize and streamline the shipping process. Just like when setting up your payment providers, click ‘Settings’ but hit the shipping icon instead.
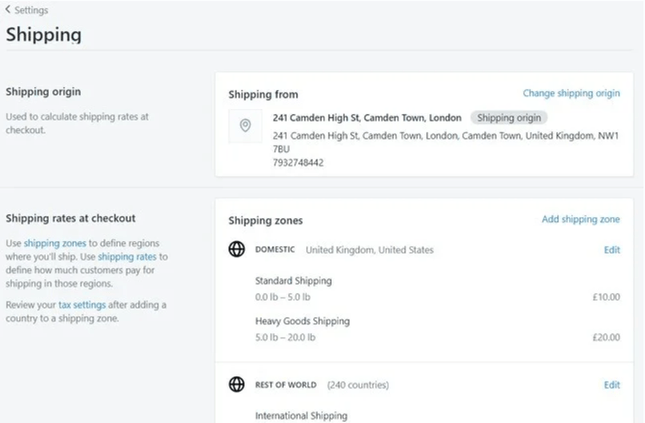
This page has everything you need for ship-shape shipping. You can add shipping zones, buy shipping labels, and decide how much you want to charge your customers.
How do I know which shipping rate is best for me?
There are different ways to calculate your shipping costs. Here’s a quick breakdown of the main ones so you can select the best for you:
- Flat shipping rates – Specific shipping rates that don’t change, but apply to each transaction regardless of the weight, shape, or size of what the customer is buying.
- Priced-based rates – Shipping rates that are determined by the price of the overall basket, for example, shipping an order under $10 might cost $4 to ship, but orders over $10 might cost $6.
- Weight-based rates – These work similarly to priced-based rates, but operate around weight, instead of price.
- Free shipping rates – This one is pretty self-explanatory. All shipping is free regardless of price or weight.
- Calculated shipping rates – These are rates generated by a shipping carrier or app. The details will be sent to the external providers at checkout, who calculate the shipping and send back the exact cost.
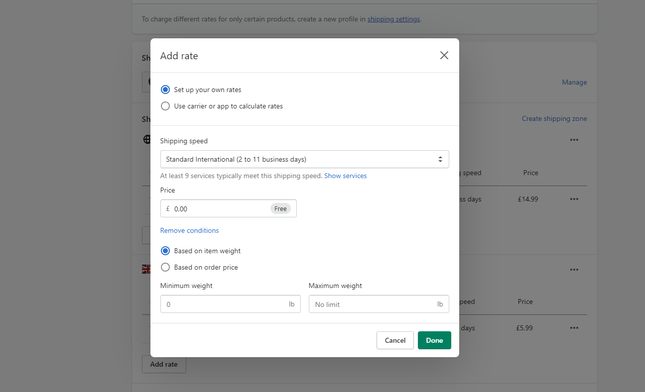
You can integrate apps like ShipWorks, AfterShip, and ShipStation to make the delivery process even smoother, but we’re saving the fun world of apps for the next step.
Shipping can feel a little daunting when you’re just getting started. Read our handy Step-By-Step Guide to Shipping Products for a full walk-through of how best to ship products to your customers.
Integrate Apps
Quick Overview
- Use apps to improve the overall functionality of your store
- The Shopify App Store has loads of free and paid apps for you to download and test
Not only is Shopify a powerful platform to start with, but it lets you add some amazing apps. By doing this, you can make your site run more smoothly, become more visible, look nicer… you get the idea. In short, they help to manage and scale your business.
Select ‘Apps’ on the navigation menu, and make the most of the brilliant search function. There are 2,400+ apps available to choose from, covering all the ecommerce areas you’d need like shipping, accounting, social media, and more. You name it, it’s there.
Some of these are available for free, but there are some that you’ll need to pay for, or at least upgrade to a paid plan if you want to access its full feature set. Luckily, most of these come with a free trial so you can test them out before you commit.
One of the best things about the Shopify App Store is that you can pick other platforms to sell your products on. For example, you can list and sell products easily on Amazon, eBay, or Etsy, and create Instagram and Facebook ads, simply by adding apps to your store.
Read our guide to using Shopify Omnisend to get an idea of the possibilities.
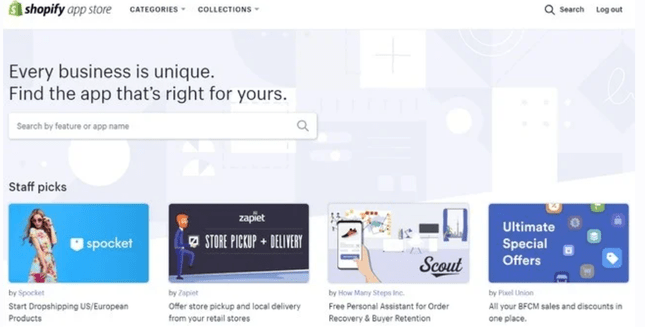
Don’t feel as if you’re cheating, though – over 80% of Shopify stores use apps.
Choose a Price Plan
Quick Overview
- You need to upgrade to a paid plan before you can publish your store
- Plans range from basic to advanced and cost between $29 and $299 per month
Before publishing your Shopify store, it’s worth noting that you’ll have to pay to keep using the platform after 14 days. You will also need to upgrade to get your site live, which we will cover in the next step.
You can upgrade at any point during your trial by hitting the unmissable ‘Select a plan’ button at the foot of every page.
The Shopify price plans are as follows:
- Basic Shopify ($29 per month)
- Shopify ($79 per month)
- Advanced Shopify ($299 per month)
The Basic Shopify plan is best for new or small stores and comes with all the features you could need to set a new store up for success. The Shopify plan is best for growing businesses – you unlock professional reports and greater shipping discounts. The Advanced Shopify plan is best for continuing to scale very large stores and comes with third-party calculated shipping rates.

Further Information
- Need more information before deciding on a plan? Check out our Shopify pricing guide.
Publish Your Shopify Store
Quick Overview
- This can only be done once you’ve chosen your paid plan
- Remove the password protection from your store so everyone can access it
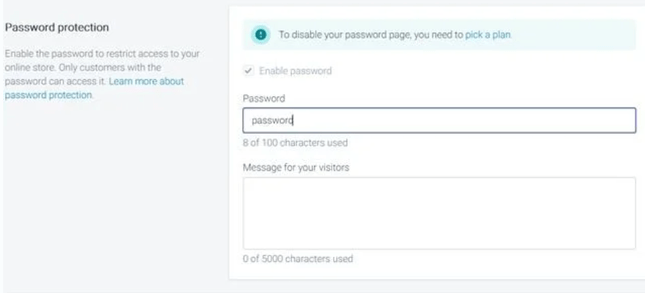
When you’re happy with your Shopify store, you need to share it with the world. During your free trial, your site is password-protected, so people can’t view it.
To get your site live, you’ll first need to upgrade to a paid plan. Once you’ve done this, head to your Shopify admin page, go to ‘Online store’, and then to ‘Preferences’. Scroll down until you see the section labeled ‘Password protection’ and make sure the ‘Enable password’ is unchecked.
This just means that when people now try to find your site, they won’t have to enter a password to enjoy your Shopify masterpiece!
‘Shopify does well as preempting and predicting what a merchant might need next in all aspects of creating a website.’
Summary: How does Shopify work?
Shopify has really focused on the user journey when creating an online store. In other words, it’s made the whole experience feel like a walk in the park. And, as you can see, a beautiful Shopify store can be yours in just 9 easy steps.
Let’s quickly recap those steps for using Shopify:
- Sign up – start your 3-day free trial with just an email.
- Add products – name, describe, and add images for your products.
- Customize your theme – edit text, add images, and choose a color scheme to make it your own.
- Add a domain – choose a custom domain for your store so that visitors can easily find you online.
- Enable payment gateways – choose from 100+ payment providers.
- Add shipping methods – set shipping costs, locations, and more so that products reach customers safely.
- Integrate apps – add extra functionality to your store with apps, such as multichannel selling.
- Choose a price plan – pick the right plan for your needs and budget.
- Publish – start gaining customers by publishing your store
Why so easy, then? Like all successful brands, Shopify has thought about the customer. It has taken extra steps to ensure you know exactly where and when to click. This way, you can build a store that looks and feels professional, even if you don’t have a single coding bone in your body.
Not only is Shopify super easy to use, but it also gives you a really strong platform for selling products. The sales features are excellent, you have access to over 2,000 apps to make your online store even more seamless, and it’s good value for money, too.
With this combination of simplicity and strength, you can’t really go wrong with Shopify.

4 comments